Best Practices for Wood Nailer Joist Detailing in Commercial Projects
In commercial construction, the details that hold a structure together are just as important as its overall design. Wood nailer joists are a prime example—a critical yet often underestimated element that bridges structural steel or concrete with finish materials like roofing, flooring, and wall systems. Getting the detailing right from the start can mean the difference between a seamless build and costly field modifications down the line.
What Is a Wood Nailer Joist — and Why Does It Matter?
Definition
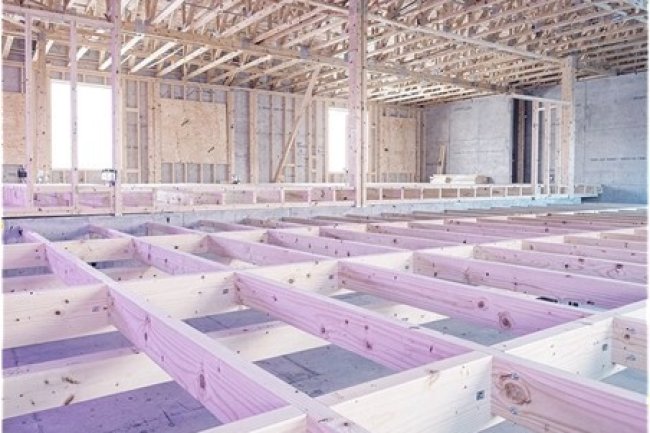
A wood nailer joist is a structural or semi-structural lumber member anchored to steel beams, concrete decks, or masonry walls. Its primary purpose is to provide a nailable surface for attaching finish elements — including roof decking, subflooring, wall cladding, and mechanical blocking.
In commercial projects, wood nailers are embedded in or fastened to the primary structural system, acting as an interface layer between the structural frame and the finish assembly.
Why It Matters
Unlike residential construction where wood framing dominates, commercial projects rely on steel or concrete structures. The wood nailer bridges this material gap, making it an essential detailing component across warehouses, retail buildings, offices, and industrial facilities.
Connects finish systems to structure
Enables secure fastening
Reduces coordination issues
Supports utilities & blocking
Understanding the Role of Detailing in Commercial Nailer Joists
Detailing is where design intent becomes construction reality. Proper wood nailer joist detailing communicates to contractors, fabricators, and field crews exactly how these members are to be sized, positioned, connected, and protected. Poorly detailed nailers are one of the most common sources of RFIs (Requests for Information) on commercial job sites — leading to schedule delays and budget overruns.
Structural Coordination
Details must align with the primary structural system — confirming load paths, bearing conditions, and compatibility with steel or concrete substrates before construction begins.
Trade Sequencing
Nailer placement affects roofing, mechanical, and electrical trades. Clear detailing establishes installation sequence and prevents conflicts between disciplines.
Code Compliance
Details must reflect applicable building codes, fire-resistance requirements, and material specifications — particularly for treated lumber in weather-exposed or contact-with-concrete applications.
Key Best Practices for Wood Nailer Joist Detailing
Select the Right Lumber Species and Grade
Always specify pressure-treated lumber (PT) for nailers in contact with concrete, masonry, or exposed-to-weather conditions. Use a minimum grade of #2 or better, and confirm species compatibility with fastener materials to prevent corrosive reactions over time.
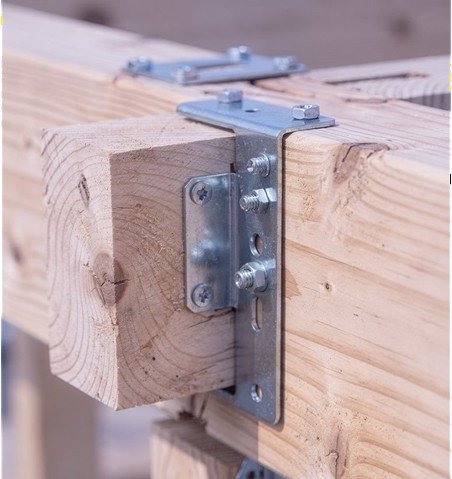
Define Fastener and Anchor Requirements Explicitly
Specify fastener type, size, spacing, and embedment depth directly on the detail drawings. Whether using powder-actuated fasteners, expansion anchors, or embedded bolts, ambiguity in the details invites field substitutions that can compromise performance.
Coordinate Nailer Height and Elevation
The top of the wood nailer must align precisely with the finished deck or roof surface. Clearly call out nailer dimensions, shimming requirements, and tolerance allowances on your details to eliminate guesswork in the field during installation.
Mistakes to Avoid in Wood Nailer Joist Detailing
Even experienced teams can fall into detailing traps that lead to costly field corrections. Understanding the most common mistakes helps you build a more reliable and constructable detail set from the start.
Omitting Treated Lumber Callouts
Failing to specify pressure-treated lumber where nailers contact concrete or masonry leads to rot, corrosion, and premature failure.
Overlooking Fire Assembly Ratings
Wood nailers must comply with fire-rated assemblies. Using unrated details can invalidate the entire fire-resistive system during inspection.
Ignoring Tolerances
Steel and concrete are rarely perfectly level. Without detailing for shimming or leveling, field crews face installation challenges.
Incomplete Cross-References
Missing links between structural, architectural, and MEP drawings create coordination gaps. Always ensure full cross-referencing.
Special Conditions: Rooftop, Parapet, and Cantilevered Nailer Details
Certain conditions in commercial construction demand extra attention in wood nailer joist detailing. Rooftop, parapet, and cantilevered conditions introduce structural, moisture, and thermal challenges that must be addressed carefully.
Specify a continuous sill gasket or closed-cell foam isolation strip beneath all rooftop nailers. This prevents thermal bridging, manages moisture infiltration, and protects the nailer from standing water — a leading cause of premature wood decay in low-slope roof applications.
Parapet nailers are exposed to wind uplift, thermal cycling, and bi-directional moisture. Use through-bolted connections, provide ventilation clearance, and include flashing to direct water away from the interface.
Where nailers extend beyond the structure, verify cantilever length and provide proper bearing using steel seats or clip angles to ensure safe load transfer to the primary structural member.
Specification Writing for Wood Nailer Joists
Clear, coordinated specifications are essential to ensure wood nailer joists perform as intended. Well-written specs eliminate ambiguity, support quality construction, and align field execution with design intent.
What Your Spec Should Cover
- Lumber species and grade designation
- Pressure treatment type and retention level (e.g., UC3B or UC4A)
- Moisture content limits at installation
- Fastener material, finish, and spacing requirements
- Allowable field substitution procedures
- Inspection and acceptance criteria
Aligning Details with Specifications
One of the most overlooked aspects of nailer joist work is coordination between drawings and written specifications. When details and specs conflict, contractors are forced to interpret which governs — often leading to errors or delays.
The solution is simple: ensure both documents communicate the same requirements. Consistency across drawings and specifications eliminates ambiguity and improves project execution.
Best Practice Tip
Include a wood blocking and nailer schedule on drawings that cross-references the relevant specification section. This provides a single, easy-to-read reference for field crews and inspectors, improving clarity and reducing misinterpretation.
How Consac Approaches Wood Nailer Joist Detailing
At Consac, our approach to wood nailer joist detailing is rooted in precision, coordination, and constructability. We focus on creating detail sets that are not only technically accurate but also clear, practical, and easy to execute in the field — ensuring seamless collaboration across all project stakeholders.
Architectural Coordination
We align nailer details with finish system requirements, ensuring full compatibility between structural and architectural drawings at every interface.
BIM & CAD Detailing
Our digital teams produce model-integrated details that reduce coordination conflicts, support quantity takeoffs, and minimize RFIs during construction.
Structural Accuracy
Every connection detail is verified for load paths, fastener capacity, and code compliance—ensuring structural integrity before issuing drawings.
Conclusion: Details That Build Confidence
Wood nailer joist detailing may not be the most glamorous aspect of commercial construction — but it is one of the most consequential. A well-detailed nailer set reduces RFIs, protects against field errors, supports code compliance, and ensures a smoother construction process.
The best structural details are the ones that never get questioned in the field — because every decision was made clearly and intentionally at the drawing board.
Specify Precisely
Every material, fastener, and dimension deserves an explicit callout — leave nothing to assumption.
Coordinate Early
Resolve elevation, fire rating, and MEP conflicts at the design stage — not during construction.
Leverage Digital Tools
BIM coordination and model-based detailing reduce errors and improve communication.
Build Constructable Details
Design with field crews in mind — simple, clear details lead to better outcomes.
What's Your Reaction?