Deck Panelization Strategy for Repetitive Structural Bays
In large-scale commercial and industrial construction, repetitive structural bays offer a significant efficiency opportunity — but only when panelization is approached with deliberate strategy. Grouping deck sheets into coordinated panels reduces field labor, minimizes material waste, and streamlines the detailing workflow from shop drawings through erection. This guide walks structural engineers and detailers through the core decisions that drive effective deck panelization.
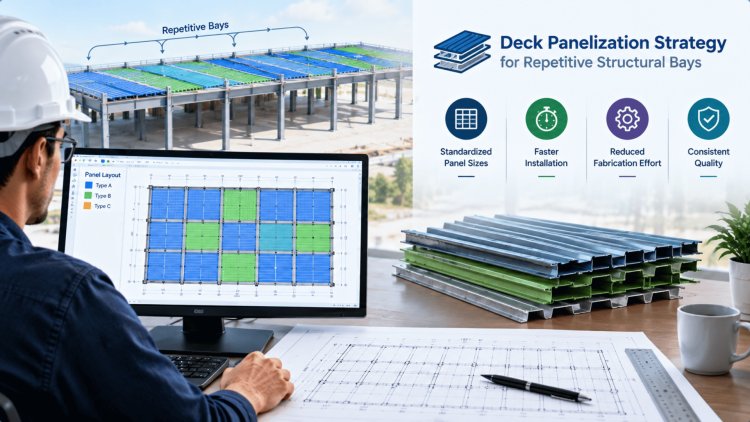
What Is Deck Panelization — and Why Does It Matter?
Deck panelization is the process of organizing individual steel deck sheets into logical, repeatable groups — called panels — that align with the structural bay grid.
Sheets Detailed in Isolation
Each deck sheet is detailed on its own, bay after bay, with no shared reference to build from.
One Master Panel, Replicated
The detailer defines a master panel that can be replicated across identical or near-identical bays, dramatically cutting drawing production time.
Where It Pays Compounding Dividends
For repetitive bay structures, this approach pays off again with every bay that repeats:
Panelization is most effective when bay geometry is established early — ideally during schematic design, before structural steel is released for fabrication.
Three technical choices define the quality of any panelization scheme. Getting them right upfront prevents costly field corrections.
Core Panelization Decisions: Sheet Width, End Laps, and Side Laps
The workflow begins by locking the structural bay grid—column lines, joist spacing, and bearing widths must be confirmed before any deck layout begins. From this grid, the detailer defines a master panel: a single, fully detailed unit that captures sheet width, end-lap locations, side-lap pattern, and support attachment. Explore how steel joist detailing influences bearing and panel edge conditions.
A disciplined panelization workflow enables efficient fabrication, bundling, sequencing, and field installation.
Panelization Workflow:
From Bay Grid to Shop DrawingShop drawings, erection plan, and a BOM organized by panel type.
Effective deck panelization is a coordination discipline as much as a detailing task. The greatest efficiency gains are achieved when structural engineers, detailers, fabricators, and erection teams align early around a common strategy focused on repetition, constructability, and clear documentation.
Never begin deck panelization until column grids, joist spacing, framing geometry, and bearing conditions have been fully verified. Late structural revisions frequently force complete re-panelization, invalidate approved shop drawings, and create avoidable detailing rework.
Coordination with the Engineer of Record before detailing begins significantly reduces downstream revision cycles.
Repetition is one of the most powerful tools available for improving fabrication efficiency and field productivity. The objective should always be to reduce panel variations to the smallest practical number.
Ideally, repetitive projects rely on a single master panel supplemented only by edge-condition variants. Every additional panel type increases drawing effort, material management complexity, bundle tracking requirements, and erection risk.
Edge bays, re-entrant corners, shaft openings, stair zones, penetration clusters, and irregular framing areas should never be assumed to follow standard panel conditions.
Exception conditions should be identified directly on erection drawings with dedicated notes, details, and schedules. Clear documentation eliminates interpretation and significantly reduces field modifications.
Organize the bill of materials by panel type rather than individual sheets. Panel-based documentation allows fabricators to package material according to erection sequence rather than manufacturing sequence.
This simplifies field staging, minimizes material handling, reduces congestion in laydown areas, and accelerates installation across repetitive projects.
The largest cost savings in deck panelization rarely come from drafting speed alone. They come from early alignment between structural engineers, deck detailers, fabricators, and erectors. When grid geometry, support conditions, panelization strategies, and fabrication packaging are coordinated before detailing begins, projects experience fewer revisions, fewer RFIs, cleaner fabrication workflows, and faster site installation.
A repetitive, well-coordinated panelization strategy reduces engineering effort, simplifies material tracking, and significantly improves field productivity throughout the life of the project.
Successful deck panelization is not measured by how many sheets are drawn. It is measured by how few unique conditions remain after coordination is complete. Lock the structure, maximize repetition, document exceptions, and deliver fabrication information organized around installation reality. Those principles consistently produce faster detailing, smoother fabrication, and more predictable field execution.
Key Takeaways & Practical Guidance
Lock the Grid First
Maximize Panel Repetition
Detail Exceptions Explicitly
Deliver a Panel-Based BOM
Recommended Panelization Workflow
Coordination Creates Efficiency
Final Practical Rule
What's Your Reaction?